
Recently, I had a few cases where I optimized Google Tag Manager setup by decreasing Tags, Triggers & Variables count 2-3 times, while improving not only tag management simplicity (I had to spend a few hours digging through the old setups, as there was a mess), but also data quality (coverage, structure, events not working).
Here are the main things that made it possible:
- Created Custom JavaScript Variables to get the needed data from the page using Element Class or ID selectors. Unfortunately, adding a proper dataLayer or JavaScript variables was not possible.
- Used RegEx Lookup Table Variables to change event names based on the created JavaScript Variables using the same Tag, instead of creating several Tags with hardcoded values.
- Used universal Blocking Triggers for tracking consent checks applied to all events, instead of duplicating Triggers and assigning additional checks for each.
- Implemented a consistent and descriptive event naming convention, as well as Tag, Trigger, and Variable naming.
And so I’ve decided to share some tips on how to optimize Google Tag Manager management with the use of:
- Variables, especially Constant and Lookup Tables
- Exception Triggers
Examples mentioned next cover only a small fraction of possibilities, but these are the most underused in my experience.
Using Variables to Send Data Instead of Hardcoded Values
Example 1 – Constant Variable for Tracking IDs
Instead of copying the tracking IDs for GA4, Meta, Google Ads, etc., into each Tag, you can create a Constant Variable and use it instead.
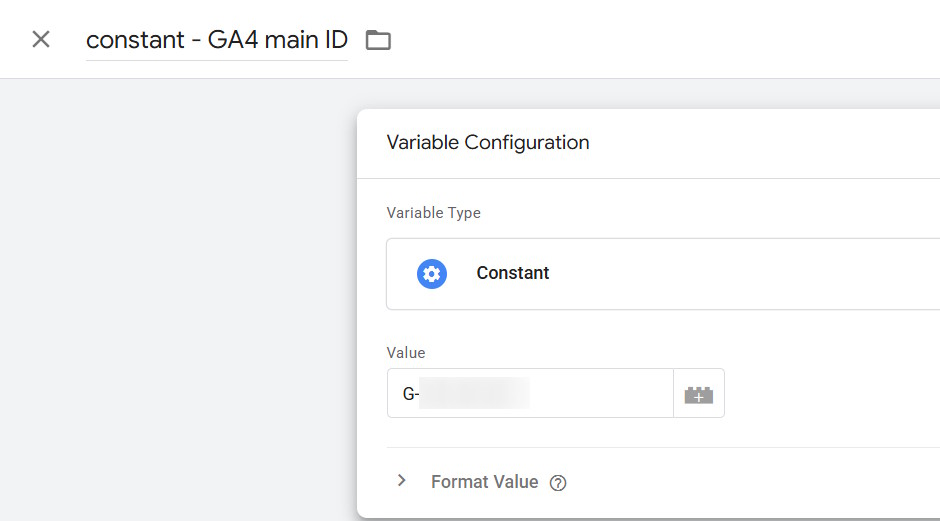
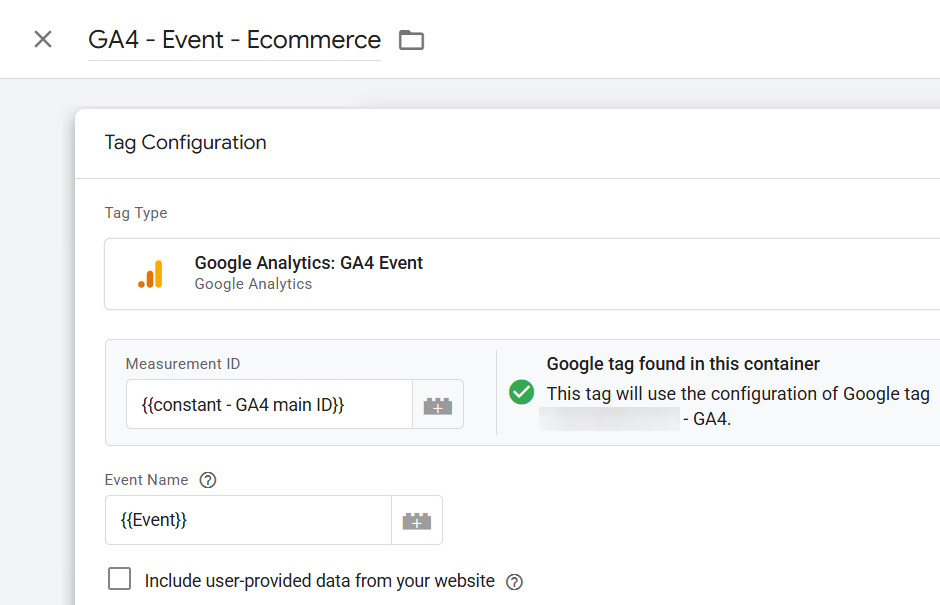
You can also use it for API keys, server-side endpoint URLs, or other predefined data that might be used across different Tags, Triggers, and Variables.
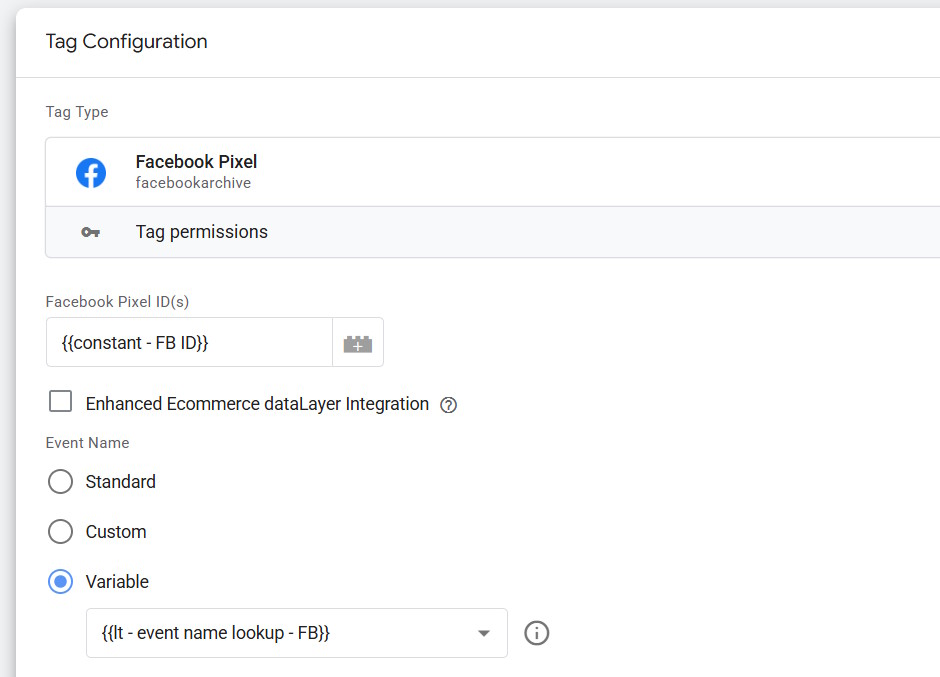
Example 2 – Lookup Table Variable for Meta Pixel Event Names
Instead of creating separate Tags for each Meta standard and eCommerce event, you can use one Tag and dynamically send the event name from a Lookup Table Variable, matching GA4 events to Meta event names:
- Match GTM/GA4 events to Meta standard event names
- Use the same Tag for all events, using the Variable to generate the correct event name
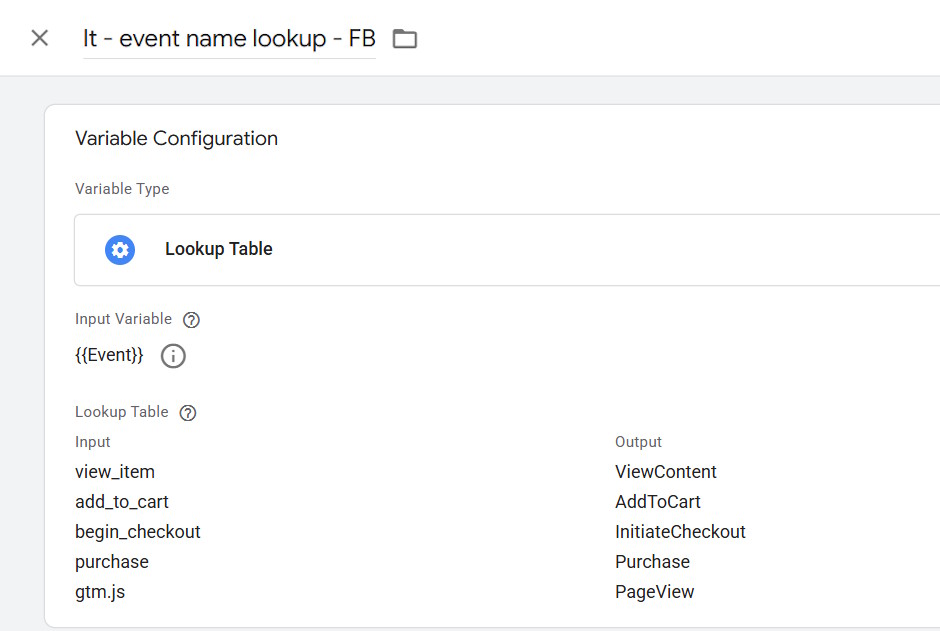
This is the most basic example, and you can use Lookup Tables for many other things, from Tag optimization to content grouping or assigning different values based on certain criteria. If you need more advanced matching, use RegEx Lookup Tables.
Of course, there could be cases where you’d want to have the Tags separately, but sometimes the mentioned approach can help manage tracking with fewer Tags.
Misuse of default and custom GA4 parameters
GA4 tags allow you to define dimensions and metrics in addition to automatically tracked data. However, this is where I often see a lot of confusion.
Before adding custom event dimensions or metrics, check whether the desired data:
- Is already tracked automatically by the tag, meaning you don’t need to rewrite it.
- Is not tracked automatically, but already has a built-in dimension or metric.
For example, there is usually no need to define page_path or page_location, as they are tracked by default – unless you want to overwrite them with a value different from what is visible in the browser.
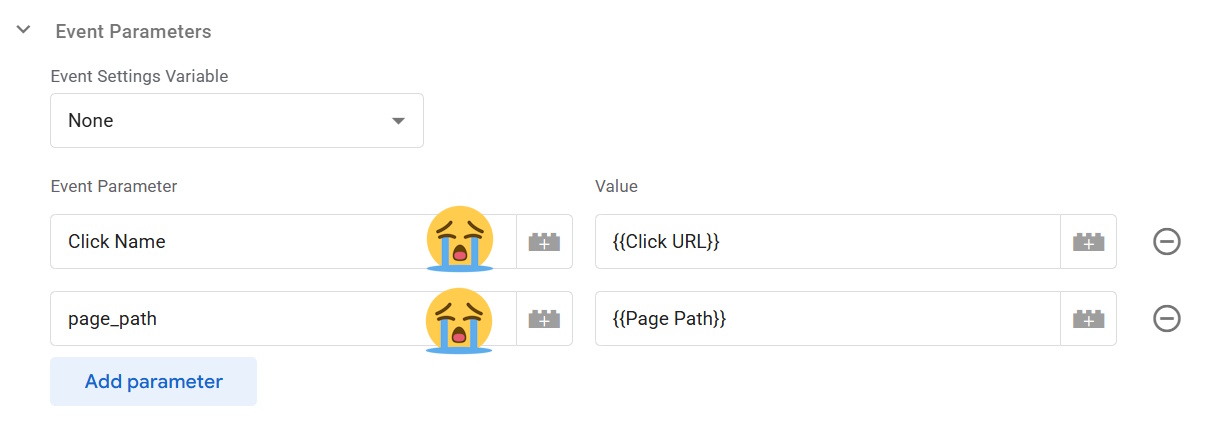
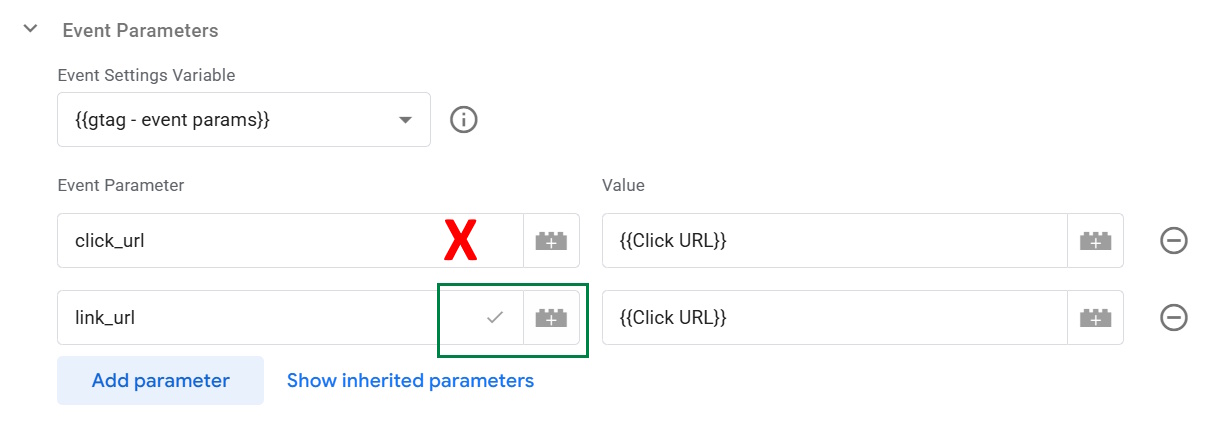
Similarly, if you want to track URLs or text from clicked links, instead of creating a custom dimension like “Click Name,” it’s better to use the existing link_url or link_text parameters. As you can see in the screenshot below, there is a checkbox showing that the link_url parameter is identified by the GA4 Tag.
Benefits of using built-in dimensions instead of creating new ones:
- No need to define custom parameters in the GA4 Admin section, otherwise they won’t appear in reports.
- No need to use a custom dimension slot, which is limited to 50 per standard (free) GA4 property.
- More consistent data, as you’re using industry-recommended parameters.
If the data you need is neither tracked automatically nor available as a built-in parameter, you can add new event parameters. Just remember to define them in the GA4 interface so they appear in reports.
Not sure whether a dimension is tracked automatically? You can check it by:
- Reviewing GA4 tag data in Preview mode
- Inspecting the GA4 hit payload in the browser DevTools console
- Checking GA4 reports
Examples of built-in automatically tracked dimensions:
- page_location
- page_path
- page_title
Examples of built-in parameters often defined or overwritten in GA4 tag settings: (use those if they fit you instead of creating new)
- link_url
- link_text
- value
- currency
- transaction_id
- items
Blocking Triggers for All Events Based on Certain Conditions
Example 1 – Manage Consent for Certain Platforms
Certain Consent Management Platforms (CMPs) and cookie banners allow users to select their data preferences by platform — e.g., explicitly deny Google Analytics tracking while allowing statistics/analytics cookies and granting analytics_storage consent.
So instead of recreating each Trigger for GA4, Google Ads, Meta, and other platforms with appropriate consent checks (which results in lots of Tags and Triggers cluttering the account), you can do a simpler setup:
- Create a Trigger for all events (using .* RegEx pattern) to run only with denied consent (matching a negative condition or not matching a positive one) for a particular platform.
- Use it as a Blocking or Exception Trigger.
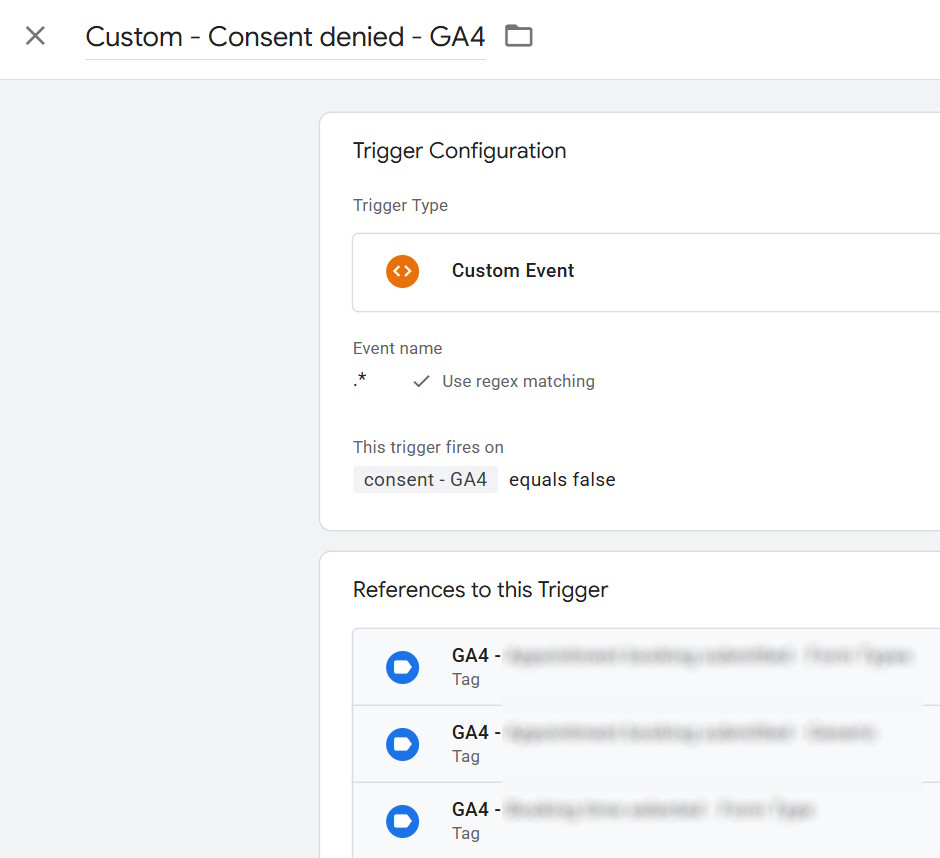
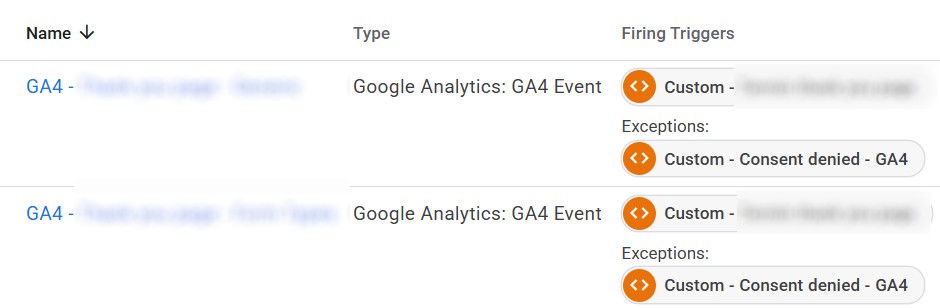
If the consent is denied (equals false or does not equal true), it will match and block the Tag from running. This way, you only need one extra Trigger per platform, instead of one per platform and existing Trigger.
Example 2 – Exclude Development Hostnames from Tracking
You can apply this Trigger to all Tags as an Exception. This setup is easy to manage — you only need to update one Trigger to add or remove settings or bulk remove this Trigger from all Tags during debugging on dev domains.
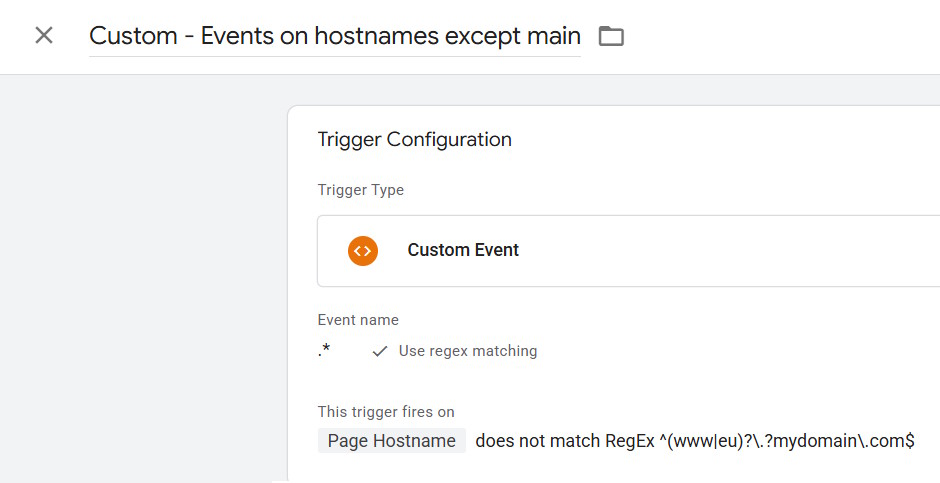
I’ve seen many GTM setups where test domain settings were managed for each Trigger separately — I don’t even want to think about how much time it would take to update all Triggers once a dev domain name is changed.
Other tips
- Use Workspaces, especially if multiple people work on the same GTM container.
- Write descriptive names for published GTM versions. Ideally, add detailed descriptions and context, but at the very least, give it a name.
- Have a proper naming convention
- Avoid Custom HTML Tags where possible; use GTM Templates instead, for example, for the Facebook pixel. Community Templates Gallery has many verified Tags for popular platforms.

- Maintain tracking documentation for dataLayer structure and values, event tracking, and overall setup specifics. Especially if you have a complicated setup with custom dataLayer events or variables added.
- Consider server-side tracking, especially if you run large ad campaigns on Google, Meta, or other ad platforms. If you already have server-side tracking, ensure that you are using a first-party domain for loading web GTM and other scripts, and sending data to the server-side container.
Other resources for GTM tips
- Google Tag Manager Best Practices: 24 Tips from Analytics Mania